Tuesday 1 November 2016

Consume JSON based ADF REST Services in ADF 12.2.1 (with REST Data Control)

In this blog we will see how to consume REST web Service and how to use in UI.

NOTE: - This features newly introduced in ADF 12.2.1.

Follow the below steps to consume the rest web services

1. From the “Gallery” select “Web Service Data Control (SOAP/REST)”.

2. The created web service data control wizard will launch and select REST.

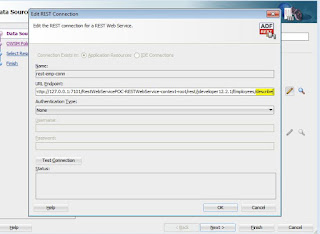
3. Now add the rest connection, click on the green plus icon. Enter the input including the describe url in URLEndpoint.

4. As we don’t have any security policies, we can skip the next step.

5. Net you can choose “Add all resources below and allow me to refresh resources from the data control palette”.

6. Now next and finish. The data control will create from the rest meta data.

7. Now we will use the created data control in UI. Drag and drop the collection in UI as a table.

8. Now the the page and all the data will display in UI.

You can download the code: Download

Thanks...

Monday 31 October 2016

Create a restful web service directly from application module in ADF 12.2.1

This blog we will see, how to create a restful web service directly from application module.

NOTE: - This features newly introduced in ADF 12.2.1.

Need to follow the below steps to create a REST web service from application module.

1. Created a application module using employee table (Connected HR schema).

2. Now open the application module and click on web service tab, then click on green plus icon, but you will get the below error like below.

3. As we have not define the release version and name in adf-config.xml to create REST Web Service, so we are getting this above error. Now let’s update adf-config.xml.

4. Now go to application module --> web service tab --> REST tab. Click on the ADD green icon. Provide the resource name and release version.

5. On click OK, jdeveloper will create a separate project for REST web services.

6. Now run the RESTWebservice application.

7. Now run the application and the URL will generate in integrated weblogic server. Click on the same URL, it will open the HTTP Analyzer.

8. Now click on “Send Request”. All the employee information will display.

9. We can pass the employee ID as a parameter in URL and display the whole information on the employee ID.

You can download the code: Download

Thanks..

Oracle JDeveloper and Oracle ADF 12c : New Features

The below is the reference location for new features of Oracle Jdeveloper and Oracle ADF

Oracle JDeveloper and Oracle ADF 12c (12.1.2.0.0): New Features
http://www.oracle.com/technetwork/developer-tools/jdev/documentation/1212-nf-1964675.html

Oracle JDeveloper and Oracle ADF 12c (12.1.3.0.0): New Features
http://www.oracle.com/technetwork/developer-tools/jdev/documentation/1213-newfeatures-2714203.html

Oracle JDeveloper and Oracle ADF 12c (12.2.1.1.0): New Features
http://www.oracle.com/technetwork/developer-tools/jdev/documentation/1213nf-2222743.html

Thanks...

Saturday 2 July 2016

How to reset af:table pagination to first page in Oracle ADF

This blog we will see how to reset the af:table pagination to predefine page.
Sometimes due to MDS the last visited page number will persist. we need to reset the old page number and set the new page number.
You can use the below code for rest the pagination 


DCIteratorBinding dcIter = (DCIteratorBinding)(BindingContext.getCurrent().getCurrentBindingsEntry()).get("your iterrator Name");
int taskIndex = 1; // It will navigate to the page where 1st element exist.
int range = dcIter.getRangeSize();
int oldStart = dcIter.getRangeStart();
int newStart = taskIndex-(taskIndex % range);
dcIter.getRowSetIterator().setRangeStart(newStart);
dcIter.setRangeStart(newStart);
RangeChangeEvent event = new RangeChangeEvent(tableBinding, oldStart, oldStart+range, newStart, newStart+range);
tableBinding.broadcast(event);
dcIter.getRowSetIterator().setCurrentRowAtRangeIndex(taskIndex % range);
dcIter.setCurrentRowIndexInRange(taskIndex % range);
AdfFacesContext.getCurrentInstance().addPartialTarget(tableBinding);

Thanks...

Sunday 26 June 2016

How to fix Java.lang.OutOfMemory exception in jDeveloper

This blog we will see how to avoid OutOfMemory exception in jDeveloper.
While working with Oracle jDeveloper we are getting the OutOfMemory exception, to fix this proble we need to edit the below files.
1. Jdev.conf
2. Ide.conf
3. setDomainEnv.cmd (for windows OS).
Jdev.conf file you can get in D:\Oracle\Middleware\jdeveloper\jdev\bin (this file path will change as per your jdeveloper installation directory).

These above variables you can change as per your system memory.
Ide.conf file you can get D:\Oracle\Middleware\jdeveloper\ide\bin (this file path will change as per your jdeveloper installation directory).

These above variables you can change as per your system memory.
setDomainEnv.cmd file you can get C:\Documents and Settings\Prabhat\Application Data\JDeveloper\system11.1.1.7.40.64.93\DefaultDomain\bin  (this file path will change as per your jdeveloper domain directory)


These above variables you can change as per your system memory and as per the java.

Thanks..

Monday 25 April 2016

Use of Masonry Layout in Oracle ADF

This blog we will see how to use masonary component in oracle ADF.

This af:masonryLayout component was introduced in Oracle ADF 12.2.1. This component has responsive UI. To view this component in desktop, mobile, tablet or any other device automatically the screen will adjust.
This layout is very useful for dashboard type of pages. To implement the same component I followed the below steps.

1. Created a simple page and added 5 panel group layouts
2. All panel grout layouts surrounded by a af:masonryLayout component.
3. Applied the style class AFMasonryTileSize2x1in all the panel group layout (you can apply the style class as per your requirement). 
Note:-The format of AFMasonryTileSize1x1 with support for 1x2,1x3,2x1,2x2,3x1,3x2 only.
4. To decorate the panel group layout created a style class like the below


.tileStyle{
background-color:#999966;
border: black;
border-width: 2px;
}


Now everything done you can run your application and now resize the browser automatically the screen will display as per the screen size. The below is the browser screen formats 
Desktop View:-


Mobile View:-


Thanks..


Sunday 24 April 2016

How to change the domain path of integrated web logic server

This blog we will see how to change the domain path of integrated weblogic server while working in jDeveloper.
While working with Oracle jDeveloper the default path of domain will be in C drive inside appdata folder, but sometimes C drive will be full and we need to create the domain in other drives.

To create the domain in other driver we need to follow the below steps
1. Right click on My Computer and select properties
2. Now you can create a system variable or user variable.
3. Click on New and give the variable name as “JDEV_USER_HOME” and mention the path where you want to create domain.
4. Now start your jDeveoper and start the integrated weblogic server and the domain will create the mentioned path.

Thanks..

Saturday 30 January 2016

How to export the specific columns in excel

This blog we will see how to export the specific columns in exported excel using af:setPropertyListener in ADF page.
In real time example sometimes we need to hide the column in exported excel.
In ADF export to excel by default it will export all the columns. But for not exporting the specific columns we need use the below code inside button

<af:commandButton text="Export to Excel"
                          binding="#{backingBeanScope.backing_ExportToExl.cb1}"
                          id="cb1">
            <af:setPropertyListener from="true"
                                                       to="#{pageFlowScope.hideColumn}"
                                                       type="action"/>
            <af:exportCollectionActionListener type="excelHTML" exportedId="t1"
                                                                            filename="Exporthidecolumnexl.xls"/>
            <af:setPropertyListener from="false"
                                                       to="#{pageFlowScope.hideColumn}"
                                                       type="action"/>
 </af:commandButton>

Set visible property in column like the below code

<af:column sortProperty="#{bindings.EmployeesVO1.hints.FirstName.name}"
                     sortable="false" visible="#{pageFlowScope.hideColumn ne true}"
                     headerText="#{bindings.EmployeesVO1.hints.FirstName.label}"
                     id="c2">
            <af:outputText value="#{row.FirstName}" id="ot4"/>
 </af:column>

Now run your application and click on the export to excel button, it will export the specific columns only

You Can download the code: Download

Thanks...